2024-06-27Last updated
Before visitors can request an area visit, you must configure the visitor management
settings for your area.
What you should know
- Visitor management for areas is off by default.
- Only area owners or a site owners can enable visitor management for areas in Genetec
ClearID™.
- The options displayed when a visit request is created vary
depending on the users requesting access and also the settings that you
configure here.
Procedure
-
Click .
-
From the
Areas
list, select an area.
-
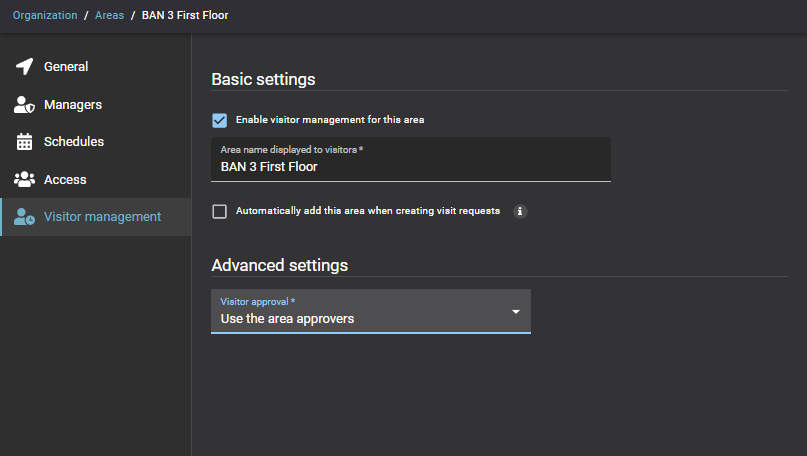
Under the Visitor
management tab,
configure
the following options:

- Basic settings
- Select the
Enable
visitor management for this area option
to enable visitor management for this
area.
- Area name displayed to visitors
- Enter the
area name that you want displayed in email notifications sent to
visitors.
- Automatically add this area when creating visit requests
- If you select this
option, all guests in your visit request are automatically granted
access to the requested area.
- Advanced settings
- If you didn’t select the Automatically add
this area when creating visit requests option,
then
specify the required approvers:
- Visitor approval
- Choose the
approvers for visitor
access
from the following options:
- Automatically approve visitors
- Automatically approve access requests for this
area.
- Use the area approvers
- Only
allow area approvers to approve or deny access requests
for this area.
- Define visit approvers
- Only
allow people in the Visit
approvers list to approve or deny access
requests for this
area.
-
Click
Save.
Visitor management is enabled for the area.
Example
Watch this video to learn more. Click the
Captions icon (CC) to turn on video
captions in one of the available languages.
After you finish
Access requests or visit requests can now be submitted for this area.

