Finding a vehicle of interest from the Investigation task

2026-03-04Last updated

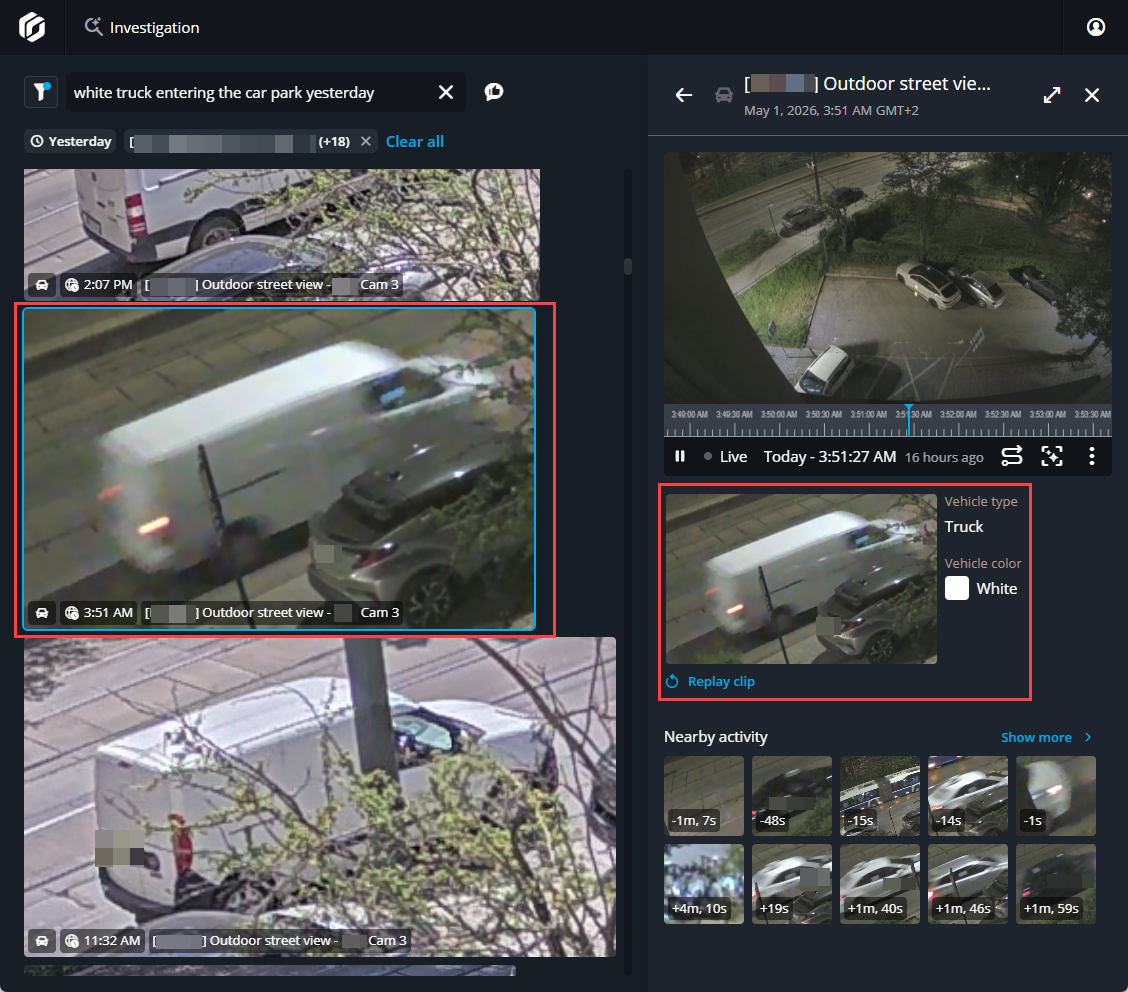
To quickly find a vehicle of interest, you can perform an intelligent search in Security Center SaaS using natural language search criteria and additional intelligent search filters. The investigation information can then be reviewed to build a timeline of events and to understand what happened before or after an incident.

Before you begin

What you should know

Use the Investigation task when you have a description or incident details such as:
  • Vehicle type or color
  • Approximate time range
  • Location including one or more cameras
Important:
This procedure should only be performed on stationary camera deployments. Intelligent search on a moving camera is not supported because moving cameras do not provide consistent metadata.

Procedure

  1. From the vertical navigation bar, click Investigation.
  2. In the search field enter your natural language search criteria and press Enter.
    For example:
    • “white truck entering the car park yesterday afternoon”.
    • “blue sedan parked outside HQ entrance last night”.
    • "vehicle outside two days ago".
    Natural language search quickly selects relevant footage without manually scanning hours of video.
  3. (Optional) To refine your search results, click the filter icon () and set your filters.
  4. To sort the results, click Sort by and select an option:
    Relevance
    Displays 500 most relevant results in order of relevance.
    Most recent
    Displays 500 most relevant results in reverse chronological order.
  5. From the Thumbnail size list, select an appropriate thumbnail size for reviewing the search results.
  6. Review the results to find your vehicle of interest.
    1. Select a video thumbnail to see more details and options.
      The video plays in the side pane tile with details below, such as the current video frame, vehicle type and color filters, and so on.
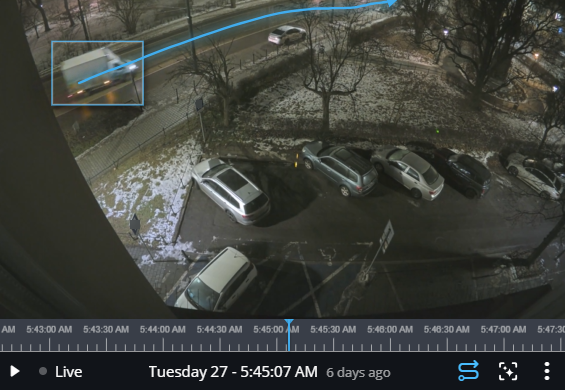
      Investigation task in Genetec Operation showing a vehicle of interest search with a video selected and side pane open showing more details.
      Reviewing thumbnails helps to validate matches quickly and avoid wasting time on irrelevant clips.
    2. To view the video in a larger format, click Maximize tile ().
    3. (Optional) Navigate the video timeline using video scrubbing to quickly scan thumbnails and find relevant footage:
      Hover over the timeline
      Hover and move the mouse over the video timeline. A thumbnail preview displays above the timeline.
      Seek in the timeline
      Click, hold, and drag the mouse along the video timeline.
  7. In the Nearby activity section, review people and vehicles in the surrounding area before and after the incident to reconstruct the scene.
    1. Click Show more to expand the nearby activity section.
    2. From the People and vehicles list, select people, vehicles, or both.
    3. From the time range list, select a time range.
    4. In the search results or the side pane, select thumbnails of any potential matches to view in the video player.
  8. (Optional) Refine the criteria and review any other thumbnails that might be a match.
Completing this investigation process provides a timeline of events, including where the vehicle or people went, who they interacted with, and what happened before or after. This provides additional context about the incident with less manual effort, and helps investigators validate evidence and generate reliable leads with greater confidence.