Importing map objects from AutoCAD to geographic maps

2026-09-18Last updated

To position entities on a geographic map automatically, import map objects from an AutoCAD drawing that contains geographic coordinates.

Before you begin

  • Create the geographic map that you want to update with imported AutoCAD map objects.
  • Ensure that the AutoCAD blocks you want to import as map objects have matching Security Center SaaS entities and have latitude and longitude attributes.

What you should know

Procedure

  1. Open the Map Designer task and select the geographic map that you want to update.
  2. Click Map > Synchronize entities from AutoCAD .
  3. Click Select file, select the AutoCAD file you want to import from, and click Open.
    A thumbnail of the AutoCAD image is shown.
  4. Click Next.
    The synchronization configuration page opens, where you can define AutoCAD block mappings.
  5. (Optional) To reuse existing synchronization settings, click Import and select the saved XML file.
    If the synchronization file references block definitions that are not present in the selected AutoCAD file, no mappings are imported.
  6. Click Add ().
  7. In the dialog box that opens, associate an AutoCAD block with an entity type.
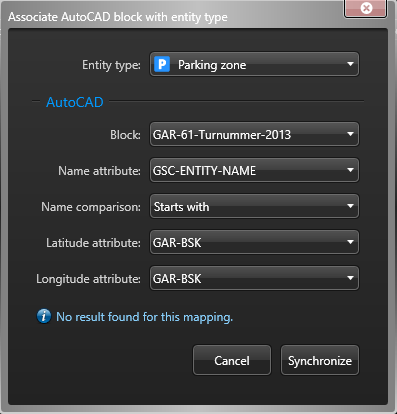
    Dialog box showing the settings used to match AutoCAD blocks to entities and map latitude and longitude attributes.
    Entity type
    Security Center SaaS entity type behind the map objects you want to import.
    Block
    Block definition to be associated to the selected entity type.
    Name attribute
    Block attribute that holds the block instance name that must match the entity name.
    Name comparison
    Search for entity names by Exact match or Starts with.
    Latitude attribute
    Block attribute that holds the GPS latitude of the map object.
    Longitude attribute
    Block attribute that holds the GPS longitude of the map object.
    If no matching entities are found, the message No result found is displayed.
    Tip:
    Verify the selected block attributes and entity-matching settings, and then try again.
  8. Click Synchronize.
    The matches found in the AutoCAD file are listed.
    Note:
    If the mapped latitude and longitude block attributes contain invalid values, no entities will be synchronized.
  9. (Optional) Associate more AutoCAD blocks with Security Center SaaS entity types.
  10. (Optional) Export your synchronization settings to an XML file for reuse.
    1. Click Export.
    2. In the file browser that opens, enter a file name and click Save.
    An XML file that captures the AutoCAD blocks to Security Center SaaS entity type synchronization settings is created. You can reuse those settings the next time you create an AutoCAD map with the same block definitions.
  11. Click Synchronize.
The selected AutoCAD blocks are synchronized with their matching entities, and the imported map objects are displayed at the geographic locations defined by the latitude and longitude attributes.