
Configuring Honeywell Galaxy Flex panels to communicate with Security Center SaaS
2026-07-14Last updated
To enable communication between a Honeywell Galaxy Flex panel and Security Center SaaS, configure the panel access over Ethernet using the Galaxy RSS application.
Before you begin
- Download and install Honeywell Galaxy RSS.
- Review the documentation related to your Honeywell Galaxy panel.
- Make sure your intrusion panels are functioning properly and have an Ethernet module installed. If they aren't functioning as expected, consult your Honeywell documentation.
- Find the panel’s IP address.
What you should know
Important:
Content in this guide
that references information found on third-party websites was accurate at the time of
publication, however, this information is subject to change without prior notice from
Genetec Inc.
Procedure
-
Under Communications, configure the panel's communication
settings.
-
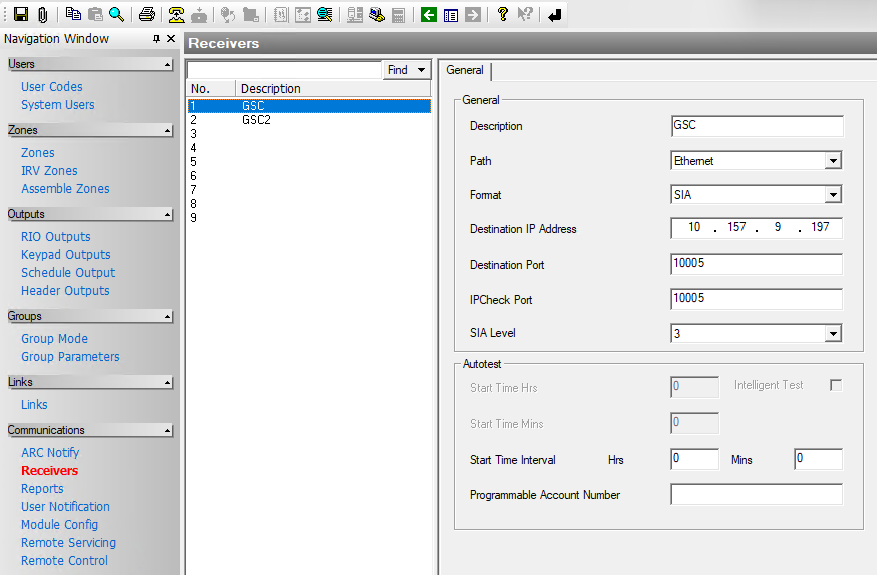
Click Receivers, then click an empty field from the list of
receivers, and enter the following in the General section:
- Description
- Enter the name of the Cloudlink.
- Path
- Select Ethernet.
- Format
- Select SIA.
- Destination IP Address
- Enter the IP address of the Cloudlink.
- Destination Port
- Enter the port that will be used when adding the Galaxy panel to Security
Center SaaS.Note:Take note of this port, as it is required when adding the panel to Security Center SaaS.
-
Click Receivers, then click an empty field from the list of
receivers, and enter the following in the General section: